SSH Keys Installation Guide
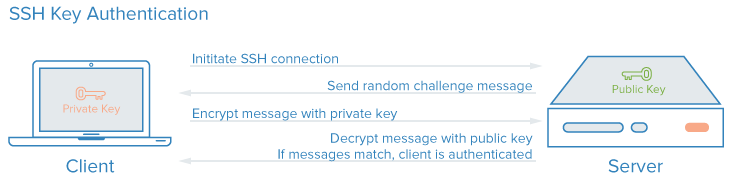
How SSH Key Authentication Works
SSH Keys are simply a method of user authentication by matching a private key (private key) and a public key (public key).
The private key and public key are tightly linked so they can recognize each other. When an SSH Key is generated, both types of keys are created. The public key is then uploaded to the server, and the private key is stored on the client machine. When logging into the server, the client sends a login request with the private key, and the server checks if the private key matches the public key on the server. If they match, access is granted.
The content of the private key and public key is completely different, but they can still recognize each other using a unique algorithm.
Step 1—Generate an RSA Key Pair
The first step is to create an SSH key pair on the client machine:
ssh-keygen -t rsa
Step 2—Save Keys and Passphrase
When you enter the key generation command, you’ll be prompted with a few questions:
Enter file in which to save the key (/home/demo/.ssh/id_rsa):
You can press Enter to skip this, and the files will be saved by default in the user’s directory (in this case, the user is “demo”).
Enter passphrase (empty for no passphrase):
It’s up to you whether you want to use a passphrase. Entering a passphrase will help protect the private key. If the private key is lost or stolen, the thief won’t be able to use it to log in to the server unless they know the passphrase. The only downside to using a passphrase is that you will have to enter the passphrase each time you log in to the server with the SSH key.
The entire key generation process will look like this:
ssh-keygen -t rsa
Generating public/private rsa key pair.
Enter file in which to save the key (/home/demo/.ssh/id_rsa):
Enter passphrase (empty for no passphrase):
Enter same passphrase again:
Your identification has been saved in /home/demo/.ssh/id_rsa.
Your public key has been saved in /home/demo/.ssh/id_rsa.pub.
The key fingerprint is:
4a:dd:0a:c6:35:4e:3f:ed:27:38:8c:74:44:4d:93:67 demo@a
The key's randomart image is:
+--[ RSA 2048]----+
| .oo. |
| . o.E |
| + . o |
| . = = . |
| = S = . |
| o + = + |
| . o + o . |
| . o |
| |
+-----------------+
The public key will be saved at /home/demo/.ssh/id_rsa.pub and the private key will be saved at /home/demo/.ssh/id_rsa.
Step 3—Copy the Public Key
Once the SSH key is generated, you need to place the public key on the server you want to use.
You can copy the public key into the server’s authorized_keys file using the ssh-copy-id command:
ssh-copy-id [email protected]
Alternatively, you can use the following command:
cat ~/.ssh/id_rsa.pub | ssh [email protected] "mkdir -p ~/.ssh && cat >> ~/.ssh/authorized_keys"
You will see something like this:
The authenticity of host '12.34.56.78 (12.34.56.78)' can't be established.
RSA key fingerprint is b1:2d:33:67:ce:35:4d:5f:f3:a8:cd:c0:c4:48:86:12.
Are you sure you want to continue connecting (yes/no)? yes
Warning: Permanently added '12.34.56.78' (RSA) to the list of known hosts.
[email protected]'s password:
Now try logging into the machine, with "ssh '[email protected]'", and check in:
~/.ssh/authorized_keys
to make sure we haven't added extra keys that you weren't expecting.
Now you should be able to log into the server [email protected] without needing to provide a password. However, if you have set a passphrase, you’ll need to enter it to log in (the same applies for future logins).
Step 4—Disable Password Authentication for Root via SSH
Once you’ve copied the SSH keys to your server and confirmed you can log in with SSH keys, you can proceed to disable password-based login for the root account, allowing root login only via SSH keys.
Open the SSH config file:
sudo nano /etc/ssh/sshd_config
Change the value of the PermitRootLogin line to:
PermitRootLogin without-password
Restart SSH.
Note—Check Permissions for the .ssh Directory on the Server
chmod 700 ~/.ssh
chmod 600 ~/.ssh/authorized_keys
Completed.
Source: Digital Ocean.
APPLY NOW
Benefits

RiverCrane Vietnam sympathizes staffs' innermost feelings and desires and set up termly salary review policy. Performance evaluation is conducted in June and December and salary change is conducted in January and July every year. Besides, outstanding staffs receive bonus for their achievements periodically (monthly, yearly).


Activities such as Team Building, Company Building, Family Building, Summer Holiday, Mid-Autum Festival, etc. will be the moments worthy of remembrance for each individual in the project or the pride when one introduces the company to his or her family, and shares the message "We are One".